
This is a transcript of an article in the Scientific American.
Allow me several introductory commentaries: It is amazing to find, as the article shows, that how little has changed in 150 years compared to the time when I worked in this field. If you like a refresher on Nib Manufacturing around the 1980s, go to my page on this topic.
An early stumbling stone was the writer’s use of the words “pens” and “pencils”; when the writer says “pen” he means “nib” and a “pencil” is a nib with holder; I left this unchanged. Or, is that the American way? I also left the text to its original and only clarified possible confusions. Obviously, the writer, reporter was not as technically minded as one would expect from someone writing for the Scientific American.
Where I considered it helpful, I added comments in italic and brackets. Furthermore, in the original print of the article, all the images formed one large page-filling engraving, for printing reasons. I have separated the individual images, touched them up and inserted them into the text where they belong.
And a bit of information about the “Scientific American”: It was established in 1845 by Munn & Co who were the editors and proprietors. It was printed weekly at 87 Park Row, New York. At the time of the publication of this article, the regular circulation was fifty thousand copies per week. The original file on the internet can be found under “scientific-american-v41-n20-1879-11-15.pdf”.

AMERICAN INDUSTRIES – No. 23.
THE MANUFACTURE OF GOLD PENS AND PENCILS
The name Faber has been connected with the manufacture of pencils for more than a century. In the year 1761 Caspar Faber (the founder of the house) began the manufacture of Faber’s pencils in the little village of Stein, near Nuremberg, Bavaria (Franken). In 1784 Anthony William (Anton Wilhelm) Faber – whose name the firm bears to this day – succeeded his father Caspar Faber.
Since the time of A.W. Faber, the commercial relations of the house have extended to all commercial countries, and the Faber pencil is a familiar object in every household and place of business. In 1851 the late Mr Eberhard Faber removed to this country (USA) and established in this city (New York) the branch house in which is centred the trade of the whole of the United States, Canada, Mexico, South America, and the West Indies.

Engraving 1 — New York Office at 718/720 Broadway
It is not the purpose of this article to give the details of the history of this very successful house, nor to describe the manufacture of lead pencils, but to give an idea of the process of making gold pens (nibs) and gold pen and pencil cases (nibs + holders).
The New York office, which is shown in the upper portion of the engraving (engraving 1 separated out!), is located at 718 and 720 Broadway, FABER’S GOLD PEN AND PENCIL FACTORY, and different departments of the new factory for the manufacture of gold pens and pencils are shown in the larger of the other views (of the main engraving). Some of the recent styles of goods are shown in the small side engravings.
A gold pen seems a very simple thing, but there are many processes in its manufacture, all requiring an amount of skill that can be acquired only by long experience.
Engraving 2 — Punching & Cutting
The gold used in this establishment is obtained in bricks from the United States Assay Office, and for pens, it is melted and alloyed to make it 16 carats fine and cast into ingots suitable for rolling (the kiln for this job is along the back wall of the gold pen shop in engraving 4); it is then rolled down to a long narrow ribbon, from which the pen blanks are cut out by means of a lever press, as shown in one of the upper views (engraving 2). (The worker steps on a long lever to operate the press.) The blank is considerably thicker than the finished pen.
The nib of the blank which is now quite blunt, is notched or recessed (made pointy and dented) at the end to receive the iridium (sphere) forming the exceedingly hard point which all good gold pens possess. The iridium is coated with cream of borax (flux, prevents oxidisation when heating the materials), ground in water, and laid in the notch formed into the end of the blank.
It is then secured by a process of sweating (meaning: soldering but the process described is fusion since no bonding material is involved), which is nothing more or less than melting the gold of which the pen is formed, so that it unites with the iridium as solidly as if the whole were a single piece of metal. See engraving 3.

Engraving 3 — Fusion of Iridium Tip
This operation, as may be imagined, requires the utmost care to prevent the complete fusion of the gold while heating it to a sufficiently high temperature to ensure the union of the two metals (which is still required the most knowhow during my days).
(more to Engraving 3: The first fellow coats the tip of the nibs with borax and places the iridium sphere into the notch at the end of the tip; he must have good eyesight. The two workmen further up the workbench perform the fusing. The nib is placed on a piece of pumice rock, which you can see the second worker holding. There are thin articulated gas pipes reaching out from the wall. At its end permanently burns a tiny flame, much smaller than the one on a cigarette lighter. The second worker holds the mouthpiece in his hand and directs the flame towards the nib. When he blows into the pipe, thus adding oxygen to the gas, the flame forms a point and gets much hotter. Through adjusting the amount of air he blows he controls the temperature.)
The blank, which is now much shorter and thicker than the finished pen, is passed between rollers of peculiar form, to give a gradually diminished thickness from the point backwards; the rolls have a small cavity over which the extreme end of the iridium pointed nib is placed, to prevent injury to the iridium. (The material had been kept thick so that it wouldn’t melt too easily.)
The blank is rolled several times through this machine to give it the proper length and thickness (to the nib). (See the three small machines, only one is operated, left of the centre at the front of the room. engraving 4) After rolling, the nib of every pen is stiffened and rendered springy by hammering. This is an important step in the manufacture of the pen, as the elasticity of the nib depends entirely upon this operation. (I can’t see where this hammering is done, I would assume, the rolling would have done the job.)

Engraving 4 — Gold Pen Shop
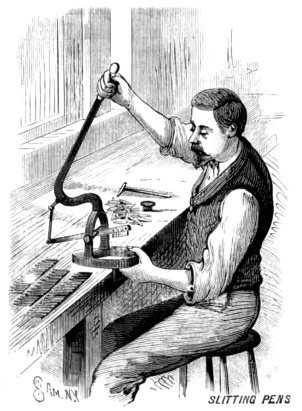
Engraving 5 — Trimming (but not slitting)
The pen blank is now somewhat out of shape and requires trimming to give it approximately its final dimensions. This trimming is done by a press something like the one used in cutting out the blanks. (This is what happens in Engraving 5. The scissor action tool is suitable to form the outer contour of the nib but not the slitting. It appears to me that the engraver of the picture mixed the caption.)
After trimming, the name of the manufacturer and the number of the pen are stamped on the blank – which is still flat – by screw presses, several of which are seen near the centre of the larger view. (They are in the back of the Engraving 4. One in the centre and three to the left near the window, recognisable through the one or two spheres attached above them.)
The next operation – that of giving the pen its convex form – is also performed by means of a screw press, the blank being pressed between a concave lower die and a convex upper die. Several blows are required to bring the pen up to the required convexity, and when this operation is completed, two jaws approach the blank and press it upon opposite edges over the sides of the upper die, and give the pen (nib) its final shape. (No engraving)

Engraving 6 — Grinding & Smoothing
The next step in the manufacture is to cut the iridium into two points, by holding it on the edge of a very thin copper disk, which is charged with fine emery and oil, and revolved at a high speed. The nib is then slit by the machine shown in one of the lower views, and the slit is cleared by means of a fine and very thin circular saw.
(Engraving 4, the guys on the right near the windows. Their operation requires a high speed provided by the high the ratio of the transmission from the large wheel near the window to the small one at the machine. The iridium is slit with the copper disk, but the slitting of the gold happens with the circular saw. Engraving 6 shows a grinding setup, which has on its left side a small blade to be used for polishing the inner edge of the tip which gives the nib smoother writing. The larger disk on the right is used for general polishing.)

Engraving 7 — Testing & Weighing
After slitting, the nibs are brought together by hammering (along the outer edges of the tines), and the pen is burnished on the inside in a concave form and upon the outside upon a convex form. This gives the pen a uniform surface and increases its elasticity (sounds more like some kind of annealing process rather than burnishing). The nibs (tines) are set by the fingers alone (hard to believe; this process comes after the polishing in engraving 6).
The grinding (polishing) lathe shown in one of the upper views (engraving 6) has a spindle carrying a thin steel disk and a copper cylinder, both of which are charged with fine emery and oil. The slit is ground (polished) by the thin disk, and the sides of the nibs and the points are ground upon the copper cylinder. (The thin disk is left to the copper cylinder on the same shaft. This fellow sits near the right window, second from the front of engraving 4.)
During the process of grinding, the points are examined from time to time with a strong magnifying glass, and when the grinding is complete, the pen is polished upon buff wheels, thoroughly cleaned, and then passed over to the inspector, who weighs and tests it, engraving 7. (Look at his attire! What a prestigious looking man. Quality Assurance was given high esteem.) These various operations are conducted in the department illustrated by the larger view in the engraving 4.
§
The lower interior view (engraving 8) represents the pencil making department, where gold pen (holders) and (lead) pencil cases or holders are made.

Engraving 8 — Pencil Factory
One of the modern pencil cases, which is extended by simply pulling one end, is a marvel of compactness. Some seven or eight pieces slide one over the other. The portion drawn out carries a spirally slotted tube which engages a pin projecting from another spirally slotted tube and revolves the tube so that it moves the lead-carrying portion of the pencil outward.
The extreme end of the spiral slot of the inner tube ends in a straight or circumferential slot, which receives the pin projecting from the lead-carrying device (right instrument in engraving 10) and prevents the latter from moving backwards when pressure is exerted on the pencil point.

Engraving 9 — Pencil Cases (Nib Holders)

Engraving 10 — Correction Scraper & Lead Pencil
The various sizes of tubes required in the manufacture of pen and pencil cases are made in the pencil department. The blanks are first cut from the sheet and bent roughly into semicircular form by hammering into a grooved block. They are then drawn through a plate to bring their edges together when they are ready to be soldered. For the internal brass tubes silver solder is used (it is strong, has a low melting point but is visible). It is applied in a finely divided state along the seam together with a little liquid borax.
The soldering is accomplished by moving the tube lengthwise in a trough formed of thin firebrick under a huge roaring blowpipe flame, which is directed into the trough. The flame is urged by a blast from a bellows, and the tube becomes hotter and hotter until the particles of silver solder melt and look like little globules of mercury, an instant more and the melted solder runs into the seam, and the operation is complete. Gold soldering is quite similar, the only difference being that the gold is applied in a thin strip instead of a powder, the strip being drawn into the seam in the tube.
After soldering, the tubes are cleaned and drawn down to the required size on a drawbench. Most of the tubes are drawn upon a mandrel to ensure equality in the internal and external diameter of the different tubes of the same nominal size.
The tubes are cut into different lengths for different purposes by a circular saw, having a gauge for regulating the lengths. The spiral slots are formed in the internal tubes of the “magic” pencil by a very ingenious and simple device, which consists simply of a tubular guide placed diagonally across the edge of the saw, the angle formed with the side of the saw corresponding to the pitch of the spiral to be cut. The tube is inserted in the guide and brought in contact with the edge of the saw has a short diagonal slit cut in it, and it is now pushed forward and at the same time allowed to turn, when a slit will be cut, having a true pitch from end to end.
(It appears to me that the magic pencil was both, a pencil holder and a nib holder. Look carefully under the nib in engraving 9, the pen to the left. Under the nib is the same tip as on the pencil holder in engraving 10, right. When there is no ink around, pull off the nib and use the pencil. Ingenious, but the idea could have been improved.)
The several operations in pen and pencil case making are carried forward by workmen who have acquired skill by long practice, and who, under the guidance of an able superintendent, make and assemble the parts rapidly. Each workman has a special piece, which he makes carefully and perfectly, so that when all the parts are brought together there is no difficulty. All of the pieces work together smoothly.
The tubes forming the outer case are drawn in plain corrugated dies and are ornamented by chasing, engraving, or knurling.
It would be futile to attempt to describe in detail the different operations in pen and pencil case making in an article of this character, as the great variety of ways in which they are made would require an entire volume to properly describe them.
While all of the goods manufactured by this house are justly entitled to the reputation they have earned, the gold pens are deserving of especial notice, as they are not only made with the greatest care and of the best materials but, by the test of use, have proved a very superior article.
PS: If there is a need, I can provide detailed descriptions of any of the engravings, please, let me know.
PPS: As usual, I let my spell and grammar checker go through anything I write. This is a transcript, not my writing but I checked it automatically. The checker’s result was 20 significant errors and 51 recommendations. This demonstrates how little spelling has changed.
PPPS: In those days, it must have been fashionable for men to wear beards. No beard – no man!
Above all: Enjoy!
Ω
Amadeus W.
Ingeneer
Posted: 4 January 2018

go to Components and Content
